Install PhpMyAdmin in Ubuntu 20.04 Lts
PhpMyAdmin is a free, open-source and web-based application that provides the administration of a MySQL or MariaDB database from a comfortable web interface.With the help of phpMyAdmin, you’ll be able to manage MySQL databases, user accounts and privileges, execute SQL-statements, import and export data in a variety of data formats etc.
First install Mysql server in your system.if it is already installed you can skip below step 1.
Step 1: Install Mysql server
sudo apt update
sudo apt install mysql-server
sudo systemctl status mysql
sudo mysql_secure_installation
Step 2: install apache and php
apt install apache2 libapache2-mod-php php
systemctl status apache2
Step 3: Install phpmyadmin
By default, phpMyAdmin is available in the Ubuntu 20.04 default repository. You can install it with below command.
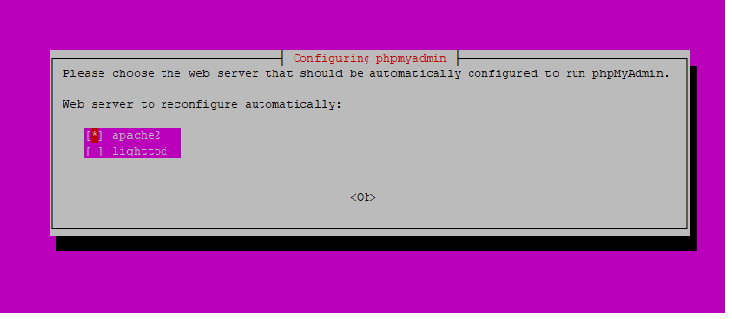
sudo apt install phpmyadminduring installation, it will ask to choose webserver

Select the Apache web server and click on 'ok' button. next it will ask to configure a database for phpMyAdmin with dbconfig-common.then select yes and hit enter. You will be asked to provide a MySQL application password for phpMyAdmin.provide password and click on ok button.
Next, restart the Apache service to apply the changes.
systemctl restart apache2Step 4: Adjust firewall
If firewall is running on your system,need to allow HTTP service in firewall
sudo firewall-cmd --permanent --add-service=http
sudo firewall-cmd --reload
Step 5: Access phpmyadmin
Now Access phpmyadmin in your webbrowser as your_systemip/phpmyadmin
In this case my url is http://192.168.0.123/phpmyadmin

Then type your user name and password and click on Go.If its dsplay below error message

This is because the current version 8.0 comes with a feature that provides root authentication via auth_socket plugin.To fix this,we need to change the default authentication mechanism from auth_socket to mysql_native_password as shown below.
root@ubuntu20:~# mysql -u root -p
Enter password:
ERROR 1045 (28000): Access denied for user 'root'@'localhost' (using password: YES)
root@ubuntu20:~# mysql -u root -p
Enter password:
Welcome to the MySQL monitor.  Commands end with ; or \g.
Your MySQL connection id is 37
Server version: 8.0.21-0ubuntu0.20.04.4 (Ubuntu)
Oracle is a registered trademark of Oracle Corporation and/or its
affiliates. Other names may be trademarks of their respective
owners.
Type 'help;' or '\h' for help. Type '\c' to clear the current input statement.
mysql> ALTER USER 'root'@'localhost' IDENTIFIED WITH mysql_native_password BY 'password';
Query OK, 0 rows affected (0.01 sec)
Now you will be able to login into phpmyadmin.

Step 6 : secure phpmyadmin with Alias
nano /etc/apache2/conf-available/phpmyadmin.confchange Alias name as nothing (you can replace it with any other name)
# phpMyAdmin default Apache configuration
#Alias /phpmyadmin /usr/share/phpmyadmin
Alias /nothing /usr/share/phpmyadmin
and restart apache service as shown below
systemcrl restart apache2Now you can access phpmyadmin with http://192.168.0.123/nothing/
Step 7: secure phpmyadmin with htaccess
we need to edit phpmyadmin.conf file as shown below
<Directory /usr/share/phpmyadmin>
    Options SymLinksIfOwnerMatch
    DirectoryIndex index.php
   AllowOverride All
now add .htaccess file to /usr/share/phpmyadmin directory
nano /usr/share/phpmyadmin/.htaccessAdd below lines to above file
AuthType Basic
AuthName "Restricted Files"
AuthUserFile /etc/phpmyadmin/.htpasswd
Require valid-user
save and close the file. then create password for user named as lampblogs
htpasswd -c /etc/phpmyadmin/.htpasswd lampblogsIt will ask to enter password and set strong password.
sample output:
root@ubuntu20:~# htpasswd -c /etc/phpmyadmin/.htpasswd lampblogs
New password:
Re-type new password:
Adding password for user lampblogs
and restart apache service once to effect changes.
systemctl restart apache2Now Access phpmyadmin in browser with Ailas and .htaccess security

once you entered username and password and click on sign in, then You will be redirected to the phpMyAdmin authentication page.Login with mysql root user and password and click on Go button and you should see phpmyadmin Managemet interface as shown in step 5.
Thats'it.we have learned how to install and secure phpmyadmin in ubuntu 20.04 Lts system.you also read our below articles related to phpmyadmin.
http://lampblogs.com/blog/install-phpmyadmin-on-centos-7
http://lampblogs.com/blog/how-to-secure-phpmyadmin-on-centos
http://lampblogs.com/blog/how-to-install-and-secure-phpmyadmin-in-ubuntu-18-04


