How to install and configure Tomcat 9 on centos 7
Apache Tomcat is an open-source web server developed by Apache Foundation to provide a pure Java HTTP server, which is useful to run Java files easily.
Tomcat 9 requires Java 8 or later.Before installing Tomcat make sure you must have JAVA installed on your Linux server to run Tomcat.
Apache Tomcat 9 support:
- Java Servlet 4.0
- JavaServer Pages 2.4
- Java Unified Expression Language 3.1
- and Java API for WebSocket 2.0 specifications.
Step1: Installing Java
# yum install java-1.8.0Once java is installed verify java version by following command.
# java -versionSample output as below
[root@lampblogs ~]# java -version
openjdk version "1.8.0_212"
OpenJDK Runtime Environment (build 1.8.0_212-b04)
OpenJDK 64-Bit Server VM (build 25.212-b04, mixed mode)
Step2: Installing Apache Tomcat 9
Download latest version of Apache tomcat (ie 9.0.21) is most Recent version at the time of writing this article.you can download from following url if there is lastet version available.
https://tomcat.apache.org/download-90.cgi# cd /opt
# wget http://mirrors.estointernet.in/apache/tomcat/tomcat-9/v9.0.21/bin/apache-tomcat-9.0.21.tar.gz
# tar -xvzf apache-tomcat-9.0.21.tar.gz
# mv apache-tomcat-9.0.21 tomcat9step 3: create Tomact user and group and set permissions
groupadd tomcat
useradd -s /bin/false -g tomcat -d /opt/tomcat tomcat
chown tomcat:tomcat -R /opt/tomcat/
chmod +x /opt/tomcat/bin/*
step 4: Set Environment Variables
Now configure the CATALINA_HOME environment variable in your system using the following commands. Its required to run the Tomcat server.
# echo "export CATALINA_HOME="/opt/tomcat"" >> ~/.bashrc
# source ~/.bashrc
you will get command output as below.
[root@lampblogs ~]# echo $CATALINA_HOME
/opt/tomcat
step 5: setup user accounts
we need to create user accounts to secure and access admin/manager
By default no user or account is allowed to access Manager GUI Page and Admin Page. So to grant access to the users add the following lines.
vim /opt/tomcat/conf/tomcat-users.xml<!-- User lampblogs who can access only manager section -->
<role rolename="manager-gui" />
<user username="lampblogs" password="<Enter-Secure-Password>" roles="manager-gui" />
<!-- User Admin Who can access manager and admin section both -->
<role rolename="admin-gui" />
<user username="admin" password="<Enter-Secure-Password>" roles="admin-gui" />
Replace secure-Password with your strong password.
step 6: start and stop tomcat service
[root@lampblogs ~]# cd /opt/tomcat/bin/
[root@lampblogs bin]# ./startup.sh
Using CATALINA_BASE: /opt/tomcat
Using CATALINA_HOME: /opt/tomcat
Using CATALINA_TMPDIR: /opt/tomcat/temp Using JRE_HOME: /usr
Using CLASSPATH: /opt/tomcat/bin/bootstrap.jar:/opt/tomcat/bin/tomcat-juli.jar
Tomcat started.
To shutdown service use below command.
[root@lampblogs bin]# ./shutdown.shstep 7: configure Apache tomcat as a service
vim /etc/systemd/system/apache-tomcat.service[Unit]
Description=Apache Tomcat 9 Servlet Container
After=syslog.target network.target [Service]
User=tomcat
Group=tomcat
Type=forking
Environment=CATALINA_PID=/opt/tomcat/tomcat.pid
Environment=CATALINA_HOME=/opt/tomcat
Environment=CATALINA_BASE=/opt/tomcat
ExecStart=/opt/tomcat/bin/startup.sh
ExecStop=/opt/tomcat/bin/shutdown.sh
Restart=on-failure
[Install] WantedBy=multi-user.targetNow reload systemd service and start using systemctl
# systemctl daemon-reload
# systemctl start apache-tomcat
# systemctl enable apache-tomcat
step 8: open tomcat port in firewall
[root@lampblogs ~]# firewall-cmd --permanent --zone=public --add-port=8080/tcp
success
[root@lampblogs ~]# firewall-cmd --reload
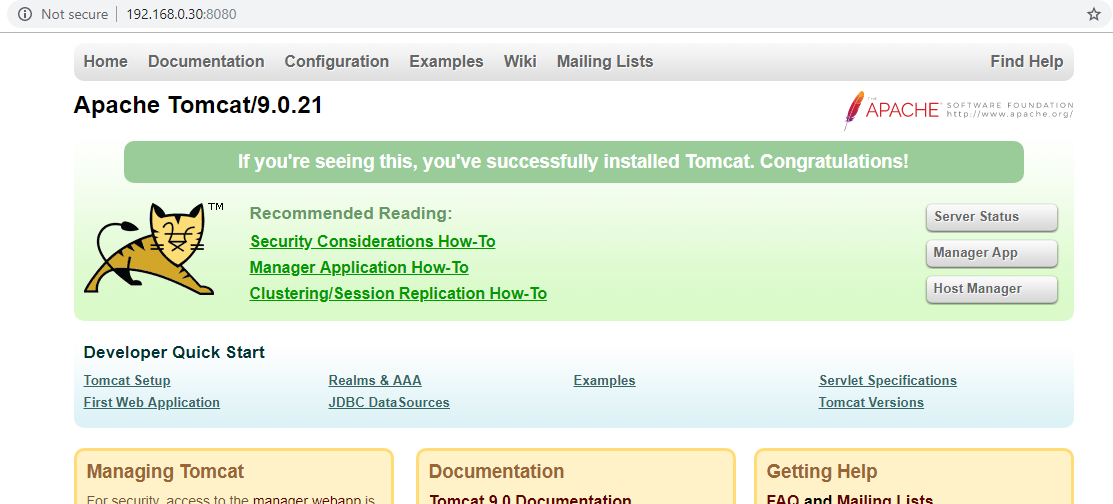
successOpen your web browser and type your server IP with port 8080. you will see Tomcat home page.
http://ip_address:8080