
Install and configure vsftpd in ubuntu 18.04
File Transfer Protocol (FTP) is a standard network protocol used for the transfer of computer files between a client and server on a computer network.FTP is built on a client-server model architecture using separate control and data connections between the client and the server.
This article is about about installing and configuring the well known and secure vsftpd(very secure file transfer protocol daemon).
First we will install vsftpd packages through apt.
root@ubuntu18:~# apt update
root@ubuntu18:~# apt install vsftpd
then check service status and set it on boot with following commands
root@ubuntu18:~# systemctl status vsftpd
root@ubuntu18:~# systemctl enable vsftpd
Also Read -> How to Install Apache Tomcat 9 on Ubuntu 18 04 LTS
Step 1: configure vsftpd.conf file
open the configuration file in your favorite text editor. We are using the nano editor for edit following conf file.First let us take backup of original conf file
root@ubuntu18:~# cp /etc/vsftpd.conf /etc/vsftpd.conf.bak
root@ubuntu18:~# nano /etc/vsftpd.conf
Add below content at the end of above conf file.
 listen=NO
 listen_ipv6=YES
 anonymous_enable=NO
 local_enable=YES
 write_enable=YES
 local_umask=022
 dirmessage_enable=YES
 use_localtime=YES
 xferlog_enable=YES
 connect_from_port_20=YES
 chroot_local_user=YES
 secure_chroot_dir=/var/run/vsftpd/empty
 pam_service_name=vsftpd
 pasv_enable=Yes
 pasv_min_port=20000
 pasv_max_port=21000
 user_sub_token=$USER
 local_root=/home/$USER/ftp
 userlist_enable=YES
 userlist_file=/etc/vsftpd.userlist
 userlist_deny=NO
save and exit the file.
Step 2: secure vsftpd with ssl
we will generate self signed ssl certificate using openssl
root@ubuntu18:~# openssl req -x509 -nodes -days 365 -newkey rsa:2048 -keyout /etc/ssl/private/vsftpd.pem -out /etc/ssl/private/vsftpd.pemonce ssl certificate is created open vsftpd.conf file
root@ubuntu18:~# nano /etc/vsftpd.confAdd below lines to above file and save it
rsa_cert_file=/etc/ssl/private/vsftpd.pem
rsa_private_key_file=/etc/ssl/private/vsftpd.pem
ssl_enable=YES
ssl_tlsv1=YES
ssl_sslv2=NO
ssl_sslv3=NO
We hope you are following "How to Install and Configure VSFTPD server in Ubuntu 18 04" step by step carefully. The remaining steps will help you to finish the upgrade process..
Step 3: Allow ports in Firewall
If the firewall is enabled and the status is active, you can open ports 20 and 21 through the following command.
root@ubuntu18:~# ufw allow 20/tcp
Rules updated
Rules updated (v6)
root@ubuntu18:~# ufw allow 21/tcp
Rules updated
Rules updated (v6)
Step 4: Setup Directory for ftp
First we will create one user
root@ubuntu18:~# adduser ftpusercreate one directory and set permissions
root@ubuntu18:~# mkdir /home/ftpuser/ftp
root@ubuntu18:~# chown nobody:nogroup /home/ftpuser/ftp
root@ubuntu18:~# chmod a-w /home/ftpuser/ftp/
create another directory to upload files and set permissions
root@ubuntu18:~# cd /home/ftpuser/ftp/
root@ubuntu18:/home/ftpuser/ftp# mkdir upload
root@ubuntu18:/home/ftpuser/ftp# chown ftpuser:ftpuser upload
Now add ftpuser in ftp user list
root@ubuntu18:~# nano /etc/vsftpd.userlistAdd ftpuser to above file and save it
Finally restart vsftpd service to apply config changes
root@ubuntu18:~# systemctl restart vsftpd
Also Read -> How to Install LAMP stack on Ubuntu 20 04 LTS
Step 5: verify with Filezilla
You can install FileZilla client and test your FTP server over SSL/TLS
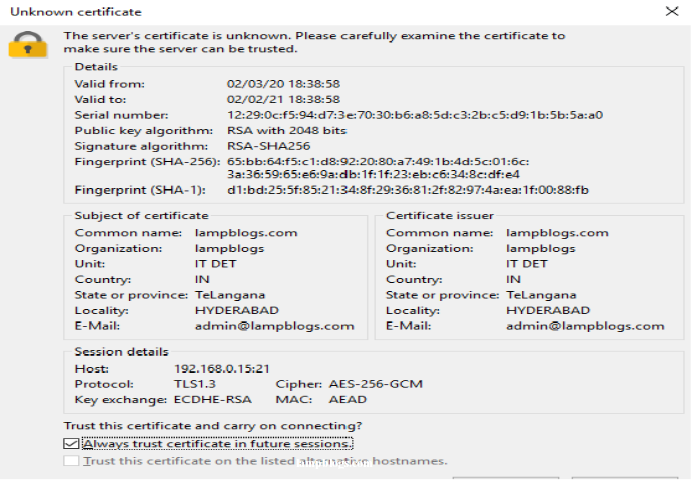
open filezilla and goto Files-Site Manager

and then verify the certificate being used for the SSL/TLS connection
Next click on connect button.you should able to see upload folder.