Configure Static IP Address on Ubuntu 18.04
Netplan is a new command-line network configuration utility to manage and configure network settings in ubuntu systems.Netplan uses configuration files with YAML syntax.
The first step is to identify the name of the ethernet interface you want to configure. You can use the ip link command as shown below
root@test-VirtualBox:~# ip link
1: lo: <LOOPBACK,UP,LOWER_UP> mtu 65536 qdisc noqueue state UNKNOWN mode DEFAULT group default qlen 1000
    link/loopback 00:00:00:00:00:00 brd 00:00:00:00:00:00
2: enp0s3: <BROADCAST,MULTICAST,UP,LOWER_UP> mtu 1500 qdisc fq_codel state UP mode DEFAULT group default qlen 1000
    link/ether 08:00:27:c6:a9:ae brd ff:ff:ff:ff:ff:ff
Netplan configuration files are stored in the /etc/netplan directory and have the extension .yaml file and you can store configurations for all your network interfaces in these files. The file may differ from one version to another. Generally, the file is named either 01-netcfg.yaml or 01-network-manager-all.yaml or 50-cloud-init.yaml etc
Also Read -> How to Install Lets Encrypt with Nginx on Ubuntu 18 04
set static ip using netplan
To assign a static IP address to enp0s3 interface edit the file as follows:
set DHCP to dhcp4: no
enp0s3: network interface name
Specify the static IP address 192.168.0.8/24.
addresses: you can add one or more IPv4 or IPv6 IP addresses that will be assigned to the network interface.
Specify the gateway as gateway4: 192.168.0.1
Under nameservers, specify the nameservers addresses: [192.168.0.1,8.8.8.8]
we need to modify yaml file like below
root@test-VirtualBox:/etc/netplan# cat 01-netcfg.yaml
# This file describes the network interfaces available on your system
# For more information, see netplan(5).
network:
  version: 2
  renderer: networkd
  ethernets:
    enp0s3:
      dhcp4: no
      addresses: [192.168.0.8/24]
      gateway4: 192.168.0.1
      nameservers:
        addresses: [192.168.0.1,8.8.8.8]
Note: yaml file might not work if there is a syntax error in the configuration.
Also Read -> How to Install and Configure Mongodb on Ubuntu 18 04
Apply netpaln
Before applying netplan we can check for errors with debug
netplan apply --debugIf you get an empty response, everything was ok and your new IP configuration has been applied.
Now Verify the changes by typing below command
root@test-VirtualBox:~# ifconfig -a
enp0s3: flags=4163<UP,BROADCAST,RUNNING,MULTICAST>  mtu 1500
        inet 192.168.0.8  netmask 255.255.255.0  broadcast 192.168.0.255
        inet6 fe80::a00:27ff:fec6:a9ae  prefixlen 64  scopeid 0x20<link>
        ether 08:00:27:c6:a9:ae  txqueuelen 1000  (Ethernet)
        RX packets 12508  bytes 13643699 (13.6 MB)
        RX errors 0  dropped 0  overruns 0  frame 0
        TX packets 7786  bytes 827514 (827.5 KB)
        TX errors 0  dropped 0 overruns 0  carrier 0  collisions 0
lo: flags=73<UP,LOOPBACK,RUNNING>  mtu 65536
        inet 127.0.0.1  netmask 255.0.0.0
        inet6 ::1  prefixlen 128  scopeid 0x10<host>
        loop  txqueuelen 1000  (Local Loopback)
        RX packets 554  bytes 46991 (46.9 KB)
        RX errors 0  dropped 0  overruns 0  frame 0
        TX packets 554  bytes 46991 (46.9 KB)
        TX errors 0  dropped 0 overruns 0  carrier 0  collisions 0
Also Read -> How to Install Yarn in Ubuntu 18 04
configure static ip on desktop
In the Activities screen, search for “network” and click on Network icon. Then you are able to see GNOME Network configuration settings. Click on cog icon.
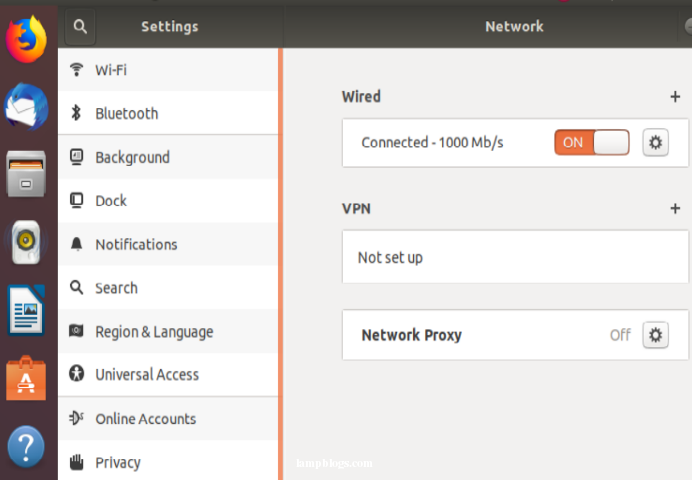
Network interface settings dialog box will open now. click on ipv4 and select "Manual" to enter ip address,subnetmask,Gatesway and dns etc.After that click on Apply to save.

You have learned how to configure static ip address on ubuntu 18.04 system.
Also Read -> How to Install Postgresql 12 in Ubuntu 18 04 bionic